This Blocksy setup guide covers more than where the buttons are. It’s built to cover the parts that actually trip people up: which header elements are free, why a starter-site import stalls, and what changes the moment WooCommerce enters the picture.
This Blocksy setup guide assumes you’ve already decided to try Blocksy, or are running it already, this is the site you’re reading right now, and it’s what we use. If you’re still deciding whether it’s the right theme at all, our Blocksy review covers the honest verdict, pricing, and how it stacks up against Astra, Kadence, and GeneratePress, worth reading first if that’s where you are.
In this guide
- What Blocksy actually is
- Installing the theme
- The Companion plugin, explained
- The Blocksy Dashboard
- Starter sites, step by step
- Finding your way around the Customizer
- Global colors and typography
- The header builder, properly explained
- A worked example: building a header
- The footer builder
- Post types and archive/single layouts
- Setting up WooCommerce with Blocksy
- Content Blocks: Blocksy’s most underused feature
- Custom fonts, sidebars and code snippets
- Extensions and modules worth knowing about
- Performance: what’s actually built in
- Plugins worth installing alongside Blocksy
- Migrating an existing site to Blocksy
- Should you install the child theme?
- Common problems and how to actually fix them
- Free vs Pro: what you genuinely need
- FAQ
What Blocksy actually is
Blocksy is a free WordPress theme built by Creative Themes, extended by a companion plugin (also free, with a paid Pro tier) that adds a visual header and footer builder, one-click starter sites, and a set of optional extensions. Structurally, it’s two separate things working together: the theme controls the base design system, and the Companion plugin controls almost everything you’d recognise as “building” a site, headers, footers, starter site imports, extensions. Understanding that split early saves confusion later, since a lot of what people call “Blocksy features” technically live in the Companion plugin, not the theme files themselves, and it’s the first thing any real Blocksy setup guide should clear up before touching a single settings screen.
It’s built on the WordPress Customizer rather than a separate page-builder interface, with live preview throughout, and it works with both the block editor (Gutenberg) and page builders like Elementor, depending on which starter sites and workflow you choose.
Installing the theme
The first real question in learning how to set up Blocksy theme is installation itself, and it’s the standard WordPress theme flow, no surprises here:
- In your WordPress dashboard, go to Appearance → Themes.
- Click Add New at the top.
- Search for “Blocksy” in the search box.
- Click Install, then click Activate once it finishes downloading.
Immediately after activating, WordPress will prompt you to install a companion plugin, this is the Blocksy Companion, covered in detail next. Don’t skip it: without it, you get the base theme design system but none of the header/footer builder, extensions, or starter sites. This matches Blocksy’s own official installation documentation, worth bookmarking directly if a future version changes any of these steps.
The Companion plugin, explained
No Blocksy setup guide is complete without covering this plugin specifically: the Blocksy Companion is a separate, free plugin that unlocks the features most people actually mean when they say “Blocksy”: the drag-and-drop-style header and footer builder, access to the full starter sites library, and the extensions system (things like a custom post types manager, a white-label option, and more). It also handles the account connection if you later upgrade to Blocksy Pro, so installing it now, even if you’re staying on the free plan indefinitely, makes any future upgrade painless rather than requiring a separate migration step.
Install it the same way as any plugin: Plugins → Add New, search “Blocksy Companion,” install and activate, or simply click through the prompt that appears right after activating the theme.
The Blocksy Dashboard
Once both the theme and Companion plugin are active, per the previous section of this Blocksy setup guide, a new “Blocksy” item appears in your WordPress admin sidebar. This is your control center, from here you reach the starter sites library, the extensions list, your license/account status if you’re on Pro, and quick links to the Customizer sections you’ll use most. If you only remember one navigation shortcut from this entire guide, make it this one: when in doubt, check the Blocksy dashboard item first, most of what you’re looking for links out from there.
Starter sites, step by step
This is the fastest path from a blank install to a finished-looking site, and it’s worth using even if you plan to heavily customize afterward, since editing an existing layout is almost always faster than building one from a blank canvas.
- From your WordPress dashboard, click Blocksy in the sidebar.
- Click the Starter Sites tab.
- Browse the library (filterable by category: Blog, Business, Ecommerce, News, Nonprofit, Personal, Portfolio, Travel) and pick one.
- Click the blue Import button on your chosen template.
- You’ll be offered the option to install the Blocksy child theme at this point, this is optional, covered in its own section below.
- Select which plugins the starter site needs (each one lists its own required plugins, usually the page builder it was built with, plus WooCommerce if it’s a shop template).
- Choose which parts of the site to import, content, widgets, customizer settings, some starter sites let you import selectively rather than all-or-nothing.
Each starter site is tagged with which builder it was made for, Gutenberg, Elementor, or both, and whether it requires Blocksy Pro. A meaningful share of the library is free; the rest requires a Pro license to unlock, which is worth checking before you fall in love with a specific design.
If the import gets stuck partway through (a very common complaint), it’s almost always one of: a hosting timeout limit that’s too low for the import script to finish, a memory limit that’s too low, or a conflicting security/firewall plugin blocking the remote content fetch. Temporarily raising your PHP memory limit and execution timeout, or trying the import again on a different, less restrictive host, resolves the vast majority of stuck imports. Blocksy’s own starter site documentation covers this exact scenario in more depth if you’re still stuck after that.
Finding your way around the Customizer
The Customizer is where the rest of this Blocksy setup guide spends most of its time, since almost everything in Blocksy lives under Appearance → Customizer, with one deliberate design choice worth calling out: it’s organised by what you’re changing, not by a flat alphabetical settings list. Editing the header shows you every header-related option in one place rather than scattered across unrelated menus, and the same logic applies to the footer, general site styling, and per-post-type settings.
Two habits make the Customizer meaningfully faster to work in. First, everything updates live in the preview pane as you change it, no save-and-refresh cycle, which makes it genuinely practical to try three variations of a setting and just look rather than guess. Second, most global settings can be overridden on a per-page or per-post basis: open the edit screen for any individual page, and the same styling controls reappear scoped to just that page, so a single “wrong for one page” setting doesn’t force a global compromise.
Global colors and typography
This is the shortest but highest-leverage stop in this Blocksy setup guide: under the Customizer’s general options, you’ll find your site-wide color palette and typography scale, the settings that quietly do more for how “designed” a site looks than almost anything else. Setting a small, deliberate color palette here (rather than picking colors ad hoc per element later) is the single highest-leverage five minutes you’ll spend in the entire setup process, since every header element, button, and content block pulls from these same global values by default. The same logic applies to typography: pick your heading and body fonts and base sizes once, here, and resist the urge to override them per-element unless you have a specific reason to.
The header builder, properly explained
Consider this section its own Blocksy header builder guide within the larger walkthrough, since it’s Blocksy’s signature feature, and the one most tutorials wave at without explaining the actual mental model. A Blocksy header is built from rows (top, main, bottom, or a “transparent” variant for pages with a hero image behind it), and each row holds elements you place left, center, or right. You’re not writing layout code, you’re dragging elements into position and configuring each one individually.
The available elements, free and Pro, per Blocksy’s own header elements documentation, are worth knowing upfront so you’re not surprised mid-build:
Available on the free plan: Account, Button, Cart, HTML, Menu (Desktop), Menu (Mobile), Search, Socials, Trigger, Widget Area.
Pro-only elements: Color Switch (a dark/light mode toggle for visitors), Compare, Contacts, Divider, Header Content Block (insert a fully custom block built in any page builder), Languages, Menu (Desktop Off-Canvas), Search Box, Wishlist.
Beyond the element list, Pro also unlocks duplicating elements, meaning you can have two independent Menu elements or two Button elements in the same header with different settings each, useful for things like a secondary utility menu above a main navigation row.
A practical build order that avoids the most common frustration (rebuilding a row you’ve already styled): place and roughly position every element you need first, across all your rows, before you start fine-tuning individual colors, spacing, and typography on any one of them. Styling an element and then discovering you need to fit two more next to it is the single most repeated wasted-effort pattern in header building.
Headers are also built from rows stacked vertically, not just the single strip most people picture. A top row commonly holds secondary information, a phone number, a language switcher, a small announcement, while the main row holds your logo and primary navigation, and an optional bottom row can carry a secondary menu or category links.
Each row can be shown or hidden per device (desktop, tablet, mobile) independently, so a top row that makes sense on desktop can simply not render on a phone screen rather than cramming everything into one line. A “transparent” header variant is also available specifically for pages with a hero image or video behind it, the header sits over the content with no background of its own until the visitor scrolls, at which point it can switch to a solid, sticky version.
A worked example: building a header
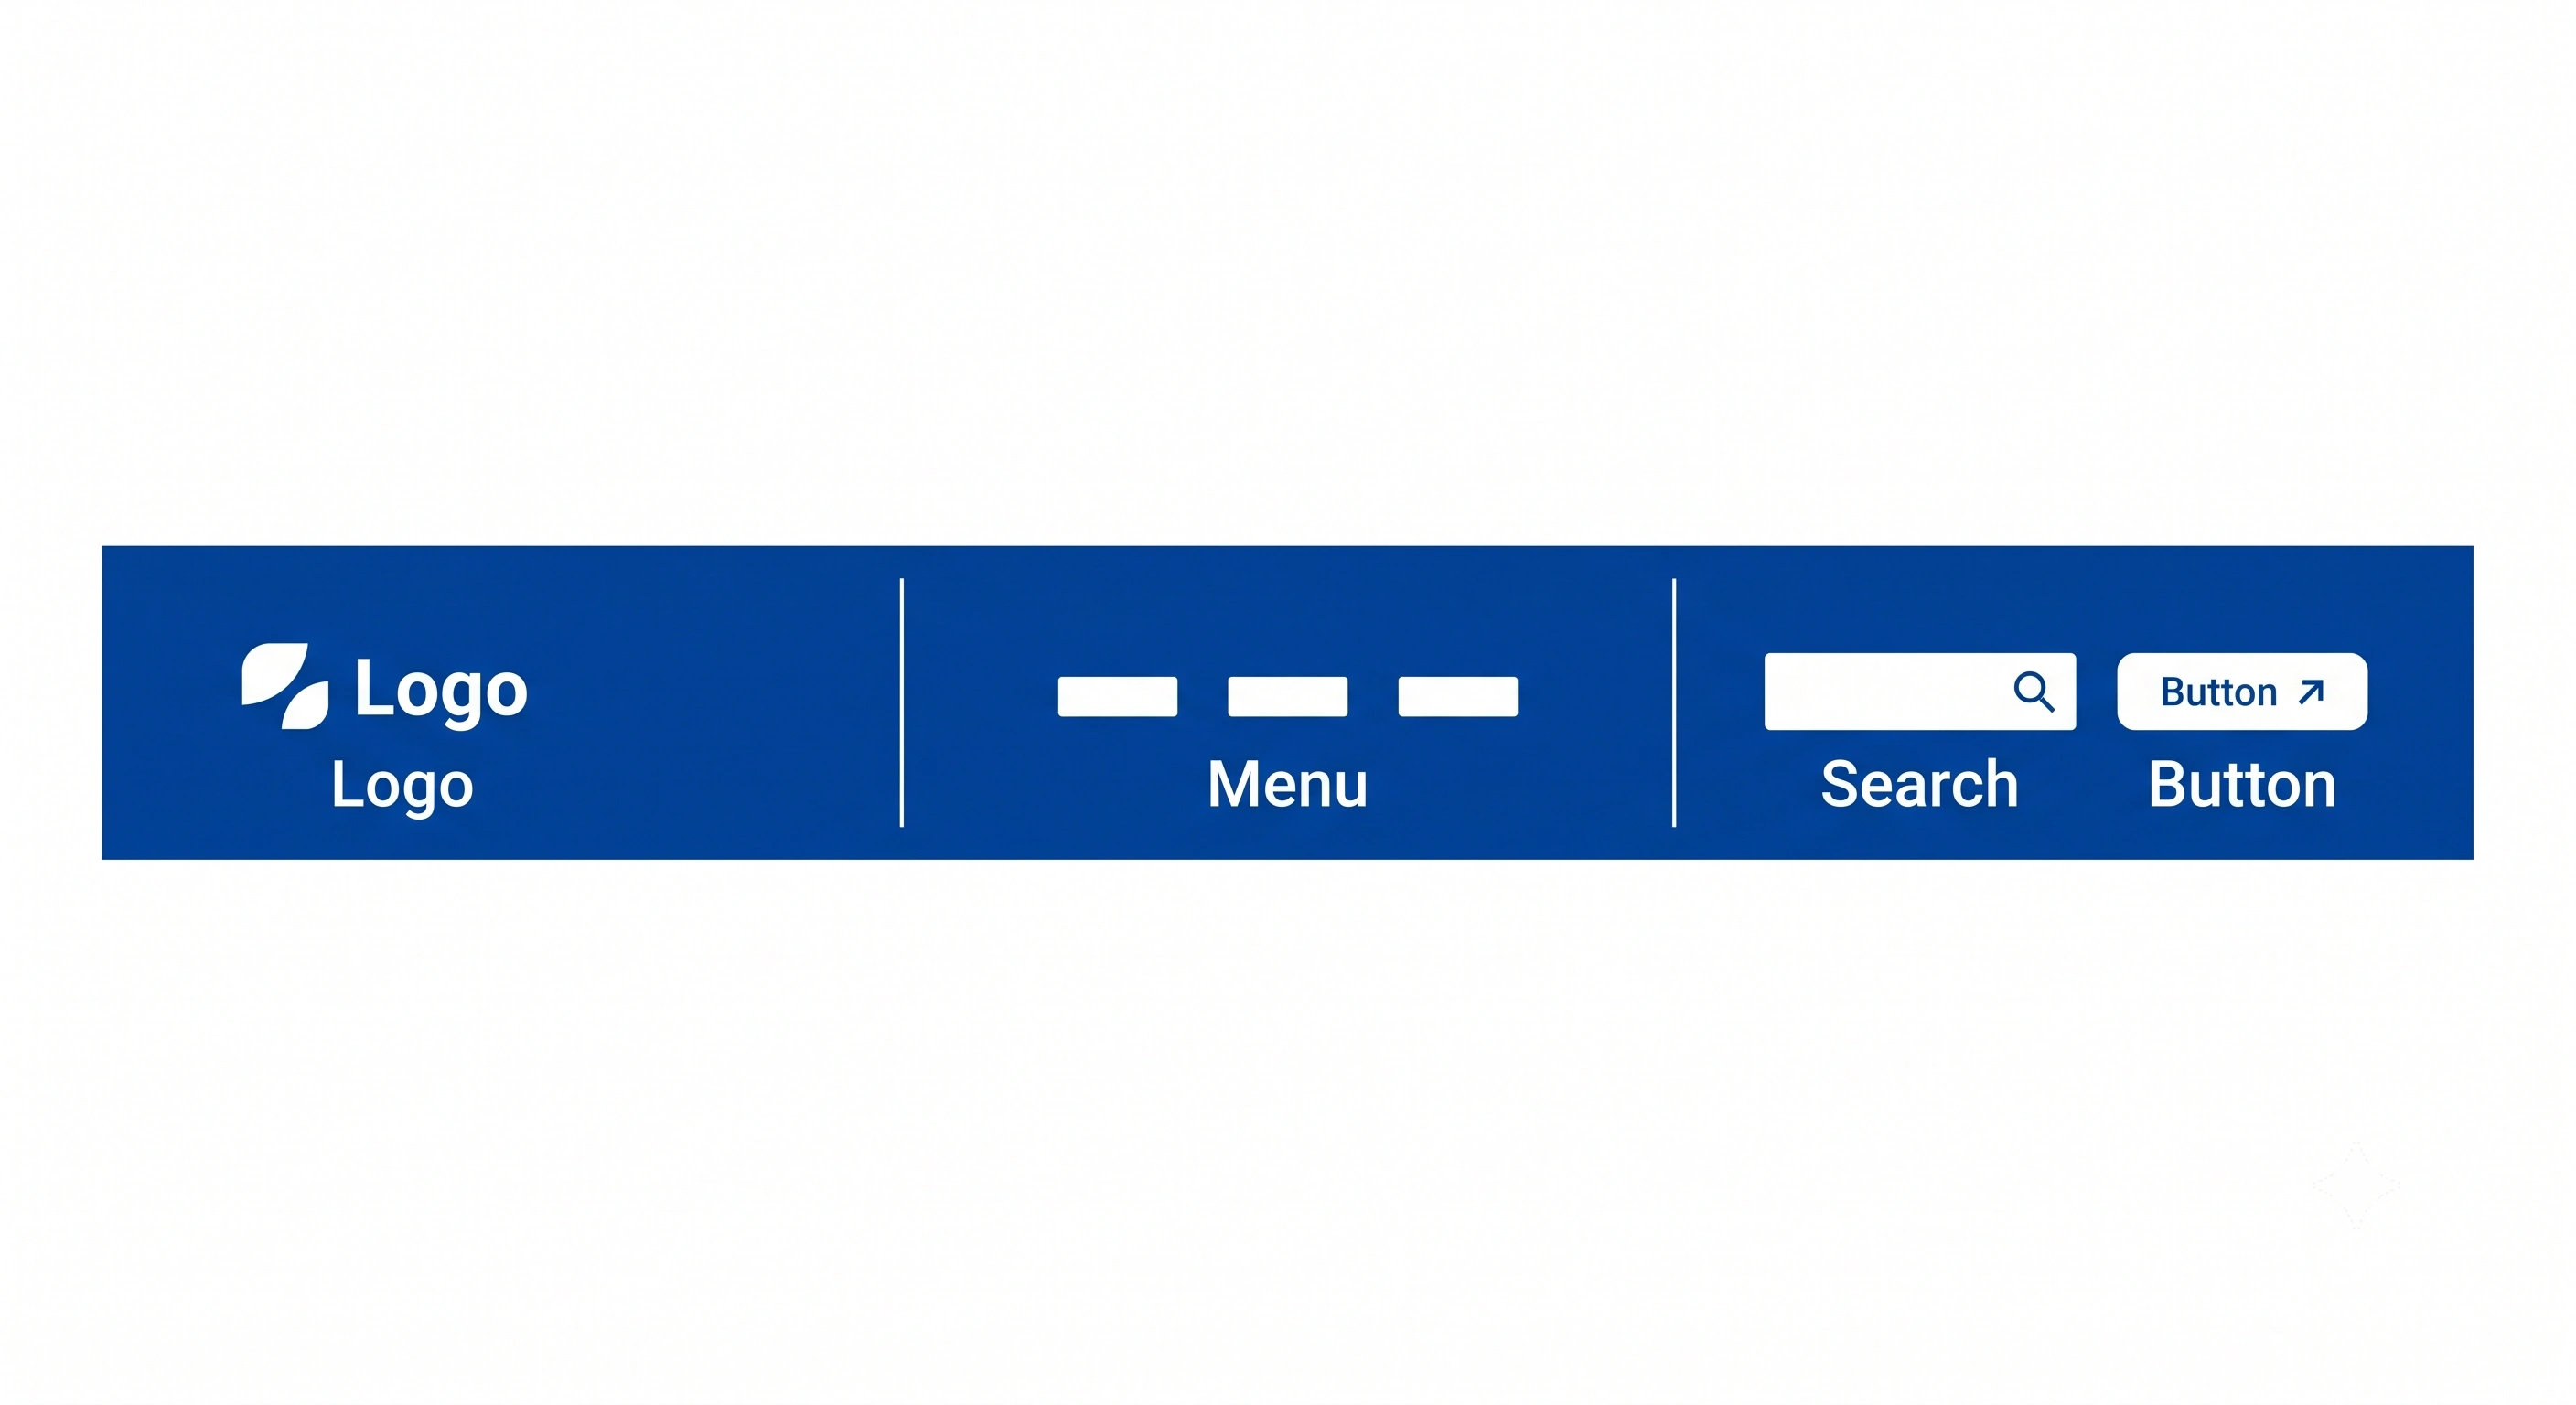
Concepts click faster with an actual build than a feature list, so this part of the Blocksy setup guide walks through a common layout, logo on the left, navigation centered, a search icon and a call-to-action button on the right, built from scratch.
- Open Appearance → Customizer → Header and select the main row.
- Drag a Logo element into the left zone. Upload your logo image here, or leave it as site title text if you don’t have one yet, you can swap it later without touching anything else.
- Drag a Menu (Desktop) element into the center zone, then assign it the navigation menu you’ve already created under Appearance → Menus (create one first if you haven’t).
- Drag a Search element and a Button element into the right zone, in that order, so the search icon sits just left of the button.
- Click into the Button element’s own settings to set its label and link, this is a good moment to point it at a contact page or a primary conversion action.
- Switch the device preview to tablet and mobile (the icons at the top of the Customizer) and confirm the center-aligned menu doesn’t overlap the logo on narrower screens, if it does, the Menu (Mobile) element (usually paired with a Trigger element to open it) takes over automatically below your chosen breakpoint.
That’s a complete, professional header with zero custom code, and it’s the same underlying pattern every more complex header in the starter sites library is built from, just with more elements and rows layered on top.
The footer builder
The shortest section in this Blocksy setup guide, on purpose: the footer builder mirrors the header builder’s row-and-element logic exactly, which is deliberate, once you understand one, you already understand the other. The available elements differ slightly to suit what a footer is actually for (copyright text, widget areas, secondary navigation, social links) rather than primary site navigation, but the row/left/center/right placement model and the free-vs-Pro element split follow the same pattern as the header.
Post types and archive/single layouts
A step this Blocksy setup guide sees skipped constantly: Blocksy detects your site’s post types, posts, pages, and any custom post type a plugin registers (WooCommerce products, for example), and gives each one its own dedicated layout settings inside the Customizer. This means your blog archive, a single blog post, your shop grid, and a single product page can each have entirely different layouts, sidebar configurations, and typography, without needing separate plugins or custom code to achieve it. If you only ever check one post type’s settings, check whichever one is your site’s actual primary content type, the default settings are sensible but rarely perfectly match a specific niche’s needs out of the box.
A concrete example of why this separation matters: a content-focused blog archive typically benefits from a wider content column, a visible sidebar for related posts or a newsletter signup, and a generous excerpt length so readers can judge whether a post is worth clicking into. A WooCommerce shop archive wants the opposite, a narrower per-product card so more items fit per row, minimal or no sidebar competing for attention, and the price and add-to-cart button visible without scrolling.
Trying to force one universal layout to serve both well is exactly the compromise Blocksy’s per-post-type settings exist to avoid, and it’s worth deliberately visiting each post type’s settings once rather than assuming the theme-wide defaults already fit every content type equally well.
Setting up WooCommerce with Blocksy
No Blocksy setup guide is complete without the commerce side, and the integration follows a clean, low-friction pattern, confirmed directly against Blocksy’s own WooCommerce documentation: install the WooCommerce plugin itself first, from Plugins → Add New, same as any other plugin, and once it’s active a new “WooCommerce” section automatically appears inside the Blocksy Customizer. You don’t install a separate “Blocksy for WooCommerce” add-on, the integration activates on its own the moment it detects WooCommerce is present.
From that new Customizer section, you get granular control over things most themes leave to WooCommerce’s own defaults: the styling of info/success/error messages, how star ratings render, a custom-styled quantity input (Blocksy replaces the plain default box with either of two designed alternatives), and full control over product badges, shape, position, and label text for sale, stock, and “new” badges.
Beyond the Customizer settings, Blocksy’s Shop Extra extension (bundled with every paid plan) layers on genuinely useful commerce features: product filters (category, attribute, or price, inline or in an off-canvas drawer), variation swatches instead of plain dropdowns, a product wishlist, a quick-view modal, side-by-side product comparison, and size guides. None of this requires a separate page builder or third-party plugin stack, it’s all first-party and specifically built to work with WooCommerce’s data structures rather than around them.
A handful of the less-advertised Shop Extra features are worth knowing about specifically because they solve real, common merchandising problems. A product brands system lets you attach a logo and description to each brand and filter the shop by it, useful the moment you carry more than one manufacturer’s products. Stock-scarcity messaging (“only 3 left”) and a free-shipping progress bar (“add $12 more for free shipping”) are both proven conversion tactics that would otherwise need a third-party plugin.
Product custom tabs let you add extra information tabs, sizing charts, care instructions, spec sheets, to individual products or whole categories via display conditions rather than editing every product page by hand. A product waitlist adds a “notify me” form to out-of-stock items, capturing demand you’d otherwise just lose. Product video support (YouTube, Vimeo, or self-hosted, with autoplay and loop options) sits directly in the product gallery alongside your photos, and a sale countdown timer adds real urgency to time-boxed promotions without needing a dedicated marketing plugin.
If you’re building a store from scratch, our own WordPress WooCommerce tutorial walks through the store setup itself, product creation, payments, shipping, taxes, in more depth than fits here; this section is specifically about how Blocksy layers on top of that baseline.
Content Blocks: Blocksy’s most underused feature
If this Blocksy setup guide only gets you to remember one advanced feature, make it this one: Content Blocks (sometimes called Hooks) are the feature most Blocksy users never fully discover, and they’re genuinely powerful once you understand what they’re for: a way to design a piece of content once, using any page builder or Gutenberg, and then inject it into a specific location on your site based on conditions you define, without touching a template file or writing code.
The practical uses stack up quickly. You can build a custom 404 page that matches your actual site design instead of the generic default. You can build an entirely custom header or footer when the visual header/footer builder’s row-and-element model isn’t flexible enough for something unusual you need.
You can insert a promotional banner that only shows to logged-out visitors, or a different one only to logged-in customers, using the user-role condition. You can set a content block to appear for a limited window of time and disappear automatically afterward, useful for a seasonal promotion you don’t want to remember to manually remove. And you can pin a block to a fixed position, top or bottom of the viewport, for something like a persistent announcement bar.
The reason this feature goes unused isn’t complexity, the interface itself is straightforward, it’s that most tutorials only cover headers and footers and never mention Content Blocks exist at all. If you find yourself thinking “I’d need a separate plugin for that” while building a Blocksy site, it’s worth checking whether a Content Block already solves it first.
Custom fonts, sidebars and code snippets
Three smaller Pro features round out this Blocksy setup guide’s coverage of the customization system and are each worth knowing exist, even if you don’t need them on day one.
Custom fonts go beyond the default Google Fonts selector: you can upload your own WOFF font files directly (useful for a brand with its own licensed typeface), customize variable-font weight ranges instead of being locked to fixed weights, or connect an Adobe Typekit (Adobe Fonts) kit by pasting its kit ID. There’s also a dedicated Google Local Fonts option that downloads and serves your chosen Google Fonts from your own server instead of Google’s, which matters specifically for GDPR compliance in the EU, since serving fonts directly from Google’s servers has been found by some European courts to constitute an unconsented transfer of a visitor’s IP address.
Custom sidebars let you build more than one sidebar and assign a different one to different pages or post types, rather than being stuck with a single global sidebar everywhere. Combined with the same display and user-role conditions used elsewhere in Blocksy, you can show a completely different sidebar to logged-in members versus anonymous visitors.
Custom code snippets give you a place to add header or footer scripts, an analytics tag, a verification meta tag, a small utility script, either globally across the whole site or scoped to just one page or post, directly from the page/post edit screen. This covers the most common reason people reach for a dedicated “insert headers and footers” plugin, without adding another plugin to maintain.
Extensions and modules worth knowing about
Rounding out this Blocksy setup guide’s tour of the Companion plugin: beyond the header and footer builder, it ships a set of optional extensions and modules you enable individually rather than all at once, keeping the site’s actual footprint limited to what you’re using. A few worth knowing exist before you need them: a Custom Post Types extension (build your own content types without a separate plugin), a Custom Fields module, a conditions system that lets you show or hide content blocks based on page, user role, or login state, and a White Label extension that lets agencies rebrand the admin experience for client handoffs.
Most of these are Pro-only, but knowing they exist changes how you plan a build, since “I’ll need a separate plugin for that” is sometimes actually “that’s a Blocksy extension I haven’t turned on yet.”
Performance: what’s actually built in
No Blocksy setup guide should skip performance entirely, and Blocksy’s speed reputation isn’t just marketing framing, it comes from a specific architectural choice: the theme and Companion plugin load CSS and JavaScript conditionally, based on what a given page actually uses, rather than loading one large stylesheet and script bundle site-wide regardless of content. A blog post that doesn’t use WooCommerce doesn’t load WooCommerce-related assets, a page without a specific header element doesn’t load that element’s styling. This matters more than it sounds: it’s the difference between a lean page and an invisibly bloated one, without you having to manually manage what loads where.
That said, a fast theme doesn’t guarantee a fast site on its own, hosting quality, image sizes, and plugin count still matter enormously and are entirely outside the theme’s control. If speed is a priority, pairing a lean theme like Blocksy with a hosting plan that isn’t the bottleneck is what actually moves the needle, our SiteGround and Hostinger reviews cover that half of the equation.
Plugins worth installing alongside Blocksy
Blocksy handles design and layout, but a finished site still needs a handful of things no theme, and no Blocksy setup guide focused only on the theme itself, should try to own. This isn’t Blocksy-specific advice, it applies to any WordPress theme, but it’s worth stating plainly since a “complete” setup guide that stops at the theme layer leaves out real, common next steps.
An SEO plugin (Yoast SEO and RankMath are the two most widely used) handles meta titles, meta descriptions, sitemaps, and schema markup, none of which a theme should be responsible for, since you’ll want to swap themes eventually without losing your SEO configuration. A caching plugin, or your host’s own built-in caching if it has one, meaningfully speeds up a site regardless of how lean the theme itself is, since caching avoids rebuilding a page from scratch on every single visit.
A security plugin covers login protection, firewall rules, and malware scanning, our own WordPress security guide goes into this in more depth, since a fast, well-designed site that gets compromised isn’t actually finished. A backup plugin, ideally one that stores backups off-site rather than on the same server, is the single cheapest insurance policy against losing months of work to a bad update, a hosting failure, or a hack.
None of these are Blocksy add-ons, and Blocksy doesn’t conflict with any of the popular options in each category, they simply sit alongside the theme, each doing one job well, which is generally a healthier long-term pattern than a single plugin trying to do everything.
Migrating an existing site to Blocksy
This Blocksy setup guide has assumed a fresh install so far, but switching an existing, live site to a new theme is a different, more careful process than starting from nothing, and it’s worth a few honest words rather than assuming everyone reading this is starting from zero.
Content itself, your posts, pages, and media, is stored independently of your theme and isn’t affected by switching, WordPress separates content from presentation by design. What does change is anything tied specifically to your old theme: custom widgets built for your previous theme’s widget areas, a header or footer built with your old theme’s own builder (if it had one), and any custom CSS that targeted your old theme’s specific class names, all of that needs rebuilding rather than transferring automatically.
The safest practical approach: build the new Blocksy version on a staging site or a subdomain first, rather than switching your live theme directly, so you can rebuild the header, footer, and key page layouts without visitors seeing a half-finished site in the process. Most reputable hosts offer one-click staging environments specifically for this.
Once the staging version looks right, and you’ve checked your most important pages, home, contact, your top few content pages, on both desktop and mobile, only then switch the live site over. Keep your old theme installed (deactivated, not deleted) for a week or two afterward as a fallback, in case something you didn’t test surfaces after the switch.
Should you install the child theme?
A quick detour in this Blocksy setup guide before the troubleshooting section: a child theme lets you add custom CSS or PHP code that survives a theme update, since anything written directly into the parent theme’s files gets overwritten the next time Blocksy updates itself. If you never plan to write custom code, skipping the child theme changes nothing about how your site looks or performs, the Customizer’s own settings already survive updates on their own. Install it the moment you plan to add even a single line of custom CSS beyond what the Customizer’s built-in “Custom CSS” field offers, retrofitting a child theme after you’ve already written a pile of custom code elsewhere is more annoying than starting with one.
Common problems and how to actually fix them
The section of this Blocksy setup guide worth bookmarking separately from the rest, since these are the five issues actually worth searching for by name when something isn’t working.
Starter site import stuck or fails partway through. Usually a hosting resource limit (PHP memory or max execution time set too low for the import script) or a security plugin blocking the remote fetch. Temporarily raise both limits (your host’s support team can usually do this in under a minute) or pause any aggressive firewall plugin during the import specifically.
Header or footer changes not showing up. Almost always a caching issue, either a caching plugin, or your host’s own server-level cache, serving a stale version of the page. Clear both, in that order, before assuming the setting itself failed to save.
A header element you expected to drag in isn’t available. Check the free-vs-Pro list above first, several of the more specialised elements (Contacts, Divider, Search Box, Wishlist) are Pro-only, this is the single most common “is this broken” support question that isn’t actually a bug.
Site feels slow despite Blocksy’s performance design. The theme controls its own asset loading, it can’t compensate for an underpowered hosting plan, an unoptimised image library, or a long list of unrelated plugins each adding their own scripts. Audit those three first.
Customizer changes aren’t reflecting on the live site at all, not even after clearing cache. Check whether you’re editing the right thing, it’s an easy mistake to edit a global setting while a more specific per-page override (set earlier, possibly by someone else on a shared project) is silently taking precedence on the page you’re actually looking at. Per-page overrides win over global settings by design, which is powerful but means a forgotten override can look identical to a bug.
A starter site imported, but images are missing or broken. Some starter sites pull demo images from an external content server during import, if that request times out or gets blocked (the same hosting-limit and firewall causes as a fully stuck import), you can end up with layout and text intact but placeholder or broken image blocks. Re-running the import, or manually re-uploading the specific missing images afterward, resolves it without needing to restart the whole process.
Free vs Pro: what you genuinely need
The last real decision point in this Blocksy setup guide: the free version, theme plus Companion plugin, is a complete, genuinely usable website builder on its own: the full header and footer builder framework, a meaningful slice of the starter sites library, core WooCommerce integration, and all of the underlying performance architecture. Pro adds the specialised header/footer elements listed above, the ability to duplicate elements, additional extensions (custom post types, white label, the full Shop Extra commerce feature set), and the rest of the starter sites library.
A fair way to think about it: if you’re building a straightforward blog, portfolio, or small business site and don’t need the specialised header elements or a full commerce feature set, the free version alone will comfortably get you to a finished, professional-looking site. The moment WooCommerce, a more advanced header layout, or a specific starter site behind the Pro paywall enters the plan, that’s the point where upgrading actually pays for itself rather than being a nice-to-have.
| Category | Free | Pro adds |
|---|---|---|
| Header elements | 10 elements, a complete basic header | 9 specialised elements, plus duplicating any element |
| WooCommerce | Message, rating, quantity-input and badge styling | 13 Shop Extra features: filters, swatches, wishlist, quick-view, compare, and more |
| Extensions & modules | Core Customizer settings, Content Blocks | Custom Post Types, White Label, custom fonts, custom sidebars, code snippets |
| Starter sites | A meaningful share of the library | The rest of the library, including most newer designs |
Header element and WooCommerce Shop Extra counts are exact, per Blocksy’s own documentation. Extensions and starter sites don’t have a single official published count, so those two rows are described rather than counted.
Blocksy setup FAQ
Do I need the Companion plugin, or just the theme?
The single most-asked question this Blocksy setup guide gets: technically the theme works alone, but almost every feature people associate with Blocksy, the header and footer builder, starter sites, extensions, lives in the Companion plugin specifically. Install both from the start.
Can I use Blocksy with Elementor instead of the block editor?
Yes, and this Blocksy setup guide applies whichever you pick. Many starter sites are built specifically for Elementor, and the theme itself doesn’t force you into Gutenberg, check each starter site’s listed builder before importing if you have a preference.
Will updating Blocksy overwrite my customizations?
A fair worry for anyone following this Blocksy setup guide closely: settings made through the Customizer are stored separately from the theme’s files and survive updates safely. Only custom code added directly to the parent theme’s own files is at risk, which is exactly what a child theme protects against.
Do I need to buy Pro before I start building?
No, and nothing in this Blocksy setup guide requires it upfront. Start on the free version, build as far as you can, and upgrade the moment you hit a feature you genuinely need, a specific header element, a Pro-only starter site, or the full commerce feature set. There’s no migration penalty for upgrading later.
Does Blocksy work with page builders other than Elementor?
Worth clarifying since this Blocksy setup guide leans on Gutenberg and Elementor examples throughout: the starter sites library is primarily built for those two specifically, but Blocksy as a theme doesn’t lock you out of other page builders, since it works at the theme level rather than controlling page content. Compatibility with a specific third-party builder still depends on that builder’s own theme-compatibility work, not just Blocksy’s.
Can I build a multilingual site with Blocksy?
A question this Blocksy setup guide gets often from agency readers: yes, the theme itself is translation-ready, and the header builder includes a dedicated Languages element (Pro) for a visible language switcher. Full multilingual content management, translating the actual posts and pages, still needs a dedicated plugin like WPML or Polylang alongside it, Blocksy provides the translation-ready foundation and the switcher UI, not a full translation management system.
What happens to my site if I stop renewing a Pro license?
Nothing this Blocksy setup guide has walked you through gets undone: your site keeps working and keeps displaying everything you’ve already built, a lapsed license stops future updates and support access, it doesn’t revert your site or disable existing features retroactively. You’d simply be unable to update to newer Companion plugin versions or unlock any new Pro features added after the license lapsed.
How often does Blocksy get updated, and is it safe to update immediately?
One last practical note before this Blocksy setup guide wraps up: both the theme and Companion plugin update regularly, roughly monthly or more often when active development is happening. As with any WordPress update, it’s good practice to check for an update note about breaking changes first, keep a recent backup before major version jumps, and update a staging copy before your live site if you’re running anything with heavy custom CSS or a Content Block relying on specific class names that could theoretically shift between versions.
Is Blocksy actually worth using over other free themes?
That’s a fair, separate question from “how do I set it up,” and it’s exactly what our dedicated Blocksy review covers in depth, including honest pricing, an accurate feature comparison against Astra, Kadence, and GeneratePress, and where Blocksy genuinely falls short. Worth reading once you’ve got a feel for the theme from actually using it.
Every step in this Blocksy setup guide was checked directly against Blocksy’s official documentation at creativethemes.com/blocksy/docs/, rather than written from memory, since an inaccurate step in a tutorial wastes more of a reader’s time than no tutorial at all. Menu paths and feature availability can shift over minor version updates, if something here doesn’t match what you’re seeing on your own installation, the official docs are always the current source of truth to defer to.